Guia minimalista para testes no Flutter — Parte 3 Testes automatizados
Passo 1 – ARRANJE!
Antes de começar a escrever testes, eu recomendo que você leia as partes anteriores!
Pacotes
Neste projeto, usarei os pacotes riverpod e mocktail para facilitar os testes e, claro, flutter_test e integration_test para testes
mas também dio para solicitações HTTP.

Como você pode ver, temos a mesma estrutura de pastas que lib na pasta de teste
Dessa forma, nossos testes ficam muito mais fáceis de acompanhar!
E no exemplo, temos 4 etapas para mostrar os dados na interface do usuário

Além disso, como sabemos, os testes consistem basicamente em três etapas;
- Organizar → Agir → Afirmar
Basicamente;
- Organizar: preparar o ambiente para o teste
(Por exemplo, crie um botão favorito) - Agir: testar o item
(Por exemplo, clique no botão) - Assert: testa se o resultado do teste é o esperado ou não
(Por exemplo, espere que o botão fique vermelho)
Usaremos essas etapas para todos os tipos de testes!
Passo 2 – AJA!
DioService — (Teste de unidade)
Este provedor é responsável por armazenar a instância dio pré-configurada.
Usaremos esta instância dio em repositórios.
final dioService = Provider((_) {
  const baseUrl = 'https://jsonplaceholder.typicode.com';
  final dio = Dio(BaseOptions(baseUrl: baseUrl));
  return dio;
});
test('DioService initialized correctly with a correct baseUrl', () {
// ARRANGE
// Create a ProviderContainer to get provider
final container = ProviderContainer();
// Get the dioService via provider
final dio = container.read(dioService);
// ASSERT
// expect Dio object is created
expect(dio, isA<Dio>());
// expect the baseUrl of the object is correct.
expect(dio.options.baseUrl, 'https://jsonplaceholder.typicode.com');
});Nota: O teste de serviço é questionável!
Principalmente, você não precisa escrever testes para serviços que usa, mas se você não confia no cara do back-end, acho que você também deve escrever testes de serviço em seu aplicativo!
PostRepository — (Teste de unidade)
PostRepository é responsável pela comunicação com o servidor usando dio uma instância que definimos anteriormente no provedor dioService, e converte os dados recebidos em objetos Post.
final postRepository = Provider((ref) => PostRepository(ref));

class PostRepository {
  final Ref ref;
  const PostRepository(this.ref);

  Future<List<Post>> getPosts() async {
    try {
      final res = await ref.read(dioService).get('/posts/');
      final List list = res.data;
      return list.map((e) => Post.fromJson(e)).toList();
    } catch (e) {
      rethrow;
    }
  }

  ...
}
// Create mock classes using mocktail
class MockDio extends Mock implements Dio {}
class MockDioResponse<T> extends Mock implements Response<T> {}
class MockDioError extends Mock implements DioError {}
...
test('getPosts', () async {
// ARRANGE
// We created a dummy data for the test
final jsonResponse = {'userId': 1, 'id': 1, 'title': '', 'body': ''};
// PostRepository depends on a dio instance but as all we know, tests should not depen on anything
// That's why we're mocking Dio and Response classes
// We could create a fake response object but mocking makes things much easier so, why bother?
final mockDio = MockDio();
final mockResponse = MockDioResponse();
// if someone asks for response.data then return [jsonResponse]
when(() => mockResponse.data).thenReturn([jsonResponse]);
// if someone call get method inside of anything then return the mocked response
when(() => mockDio.get(any())).thenAnswer((_) async => mockResponse);
// We should override dioService with the mocked dio object to isolate our repository.
// In this we we don't depend on the backend anymore.
final container = ProviderContainer(
overrides: [
dioService.overrideWithValue(mockDio),
],
);
// ACT
// just get the repository instance and call the getPosts method to test it!
final result = await container.read(postRepository).getPosts();
// ASSERT
// Lastly, we need to expect the result is the same as we expect
expect(
result,
isA<List<Post>>().having((list) => list.first.id, 'first element id', 1),
);
// and we can also verify whether dio called the get method with '/posts' path or not
verify(() => mockDio.get('/posts/')).called(1);
});
test('getPosts - got an exception from dio', () async {
// ARRANGE
final mockDio = MockDio();
final mockError = MockDioError();
when(() => mockDio.get(any())).thenThrow(mockError);
final container = ProviderContainer(
overrides: [
dioService.overrideWithValue(mockDio),
],
);
expect(
// ACT
() async => await container.read(postRepository).getPosts(),
// ASSERT
throwsA(isA<DioError>()),
);
verify(() => mockDio.get('/posts/')).called(1);
});Você pode pensar que, por que recriou as instâncias novamente, poderia usar os métodos setUp e tearDown, ou até mesmo usar apenas uma instância no topo e usá-las novamente.
E minha resposta é, sim, poderíamos, mas a repetição de código é boa em testes e a ideia principal é isolar os testes e escrever um código fácil de ler e rastreável.
É um tema meio polêmico. Eu prefiro assim, só isso!
Pós-(Teste de Unidade)
Se quisermos obter 100% de cobertura em nosso projeto, devemos escrever testes para as classes de dados também!
class Post {
  Post({
    required this.userId,
    required this.id,
    required this.title,
    required this.body,
  });

  final int userId;
  final int id;
  final String title;
  final String body;

  factory Post.fromJson(Map<String, dynamic> json) => Post(
        userId: json["userId"],
        id: json["id"],
        title: json["title"],
        body: json["body"],
      );

  Map<String, dynamic> toJson() => {
        "userId": userId,
        "id": id,
        "title": title,
        "body": body,
      };
}
test('fromJson', () {
// ARRANGE
final jsonResponse = {'userId': 1, 'id': 1, 'title': '', 'body': ''};
// ACT
final post = Post.fromJson(jsonResponse);
// ASSERT
expect(post, isA<Post>().having((e) => e.id, 'id', 1));
});
test('toJson', () {
// ARRANGE
final postData = Post(id: 1, userId: 1, title: '', body: '');
// ACT
final json = postData.toJson();
// ASSERT
expect(json, isA<Map<String, dynamic>>().having((e) => e['id'], 'id', 1));
});
PostsProvider — (Teste de unidade)
PostsProvider responsável por obter os dados do repositório e distribuí-los à IU. Neste cenário, usamos FutureProvider. Porque reduz todo o processo chato, como tratamento de erros e estado de carregamento, para nós sob o capô.
final postsProvider = FutureProvider((ref) {
  return ref.read(postRepository).getPosts();
});
test('getPosts', () async {
// ARRANGE
// create mocks for dependencies
final mockPostRepository = MockPostRepository();
// set behaviors for the dependencies
when(mockPostRepository.getPosts).thenAnswer((_) async => <Post>[]);
// override the dependencies
final container = ProviderContainer(
overrides: [
postRepository.overrideWithValue(mockPostRepository),
],
);
// ASSERT
// make sure that initial value is AsyncLoading
expect(container.read(postsProvider), const AsyncLoading<List<Post>>());
// ACT
// call the futureProvider and await
await container.read(postsProvider.future);
// ASSERT
// then expect data is arrived correctly
expect(container.read(postsProvider), isA<AsyncData<List<Post>>>());
verify(mockPostRepository.getPosts).called(1);
});
// We're also testing the error scenario
test('return AsyncValue.error when got an error', () async {
// ARRANGE
final exception = Exception();
final mockPostRepository = MockPostRepository();
when(mockPostRepository.getPosts).thenThrow(exception);
final container = ProviderContainer(
overrides: [
postRepository.overrideWithValue(mockPostRepository),
],
);
// ASSERT
expect(
container.read(postsProvider),
isA<AsyncError<List<Post>>>().having((e) => e.error, 'error', exception),
);
verify(mockPostRepository.getPosts).called(1);
});
PostList — (Teste de Widget) — Além disso, Exemplo de BDD!
PostList é apenas um widget que mostra o estado de nosso postsProvider.
Vamos dar uma olhada neste cenário usando o método BDD agora!
Recurso: obtenha dados de ‘postRepository’ e exiba-os na interface do usuário de acordo com o processo
Cenário: o usuário abre [HomePage] Dado lista de postagens
Quando os dados estão sendo buscados
Então [PostList] deve exibir um widget de carregamento
Quando os dados estiverem prontos
Então [PostList] deve exibir uma lista de postagens
Dado um erro para lançar
Quando os dados estão sendo buscados
Então [PostList] deve exibir um widget de carregamento
Quando obter um erro ao buscar os dados
Então [PostList] deve exibir uma mensagem de erro
class PostList extends ConsumerWidget {
  const PostList({super.key});

  @override
  Widget build(BuildContext context, WidgetRef ref) {
    final asyncPosts = ref.watch(postsProvider);

    return asyncPosts.when(
      data: (list) => ListView.builder(
        itemCount: list.length,
        itemBuilder: (_, i) => PostCard(list[i]),
      ),
      error: (_, __) => const Center(child: Text('error')),
      loading: () => const Center(child: CircularProgressIndicator()),
    );
  }
}
testWidgets('list the given data', (WidgetTester tester) async {
// ARRANGE
final list = [
Post(id: 1, userId: 1, title: '', body: ''),
Post(id: 2, userId: 2, title: '', body: ''),
Post(id: 3, userId: 2, title: '', body: ''),
];
await tester.pumpWidget(
ProviderScope(
overrides: [
postsProvider.overrideWithProvider(
FutureProvider((_) async => list),
),
],
child: const MaterialApp(
home: PostList(),
),
),
);
// ASSERT
expect(find.byType(CircularProgressIndicator), findsOneWidget);
expect(find.byType(ListView), findsNothing);
// ACT
await tester.pumpAndSettle();
// ASSERT
expect(find.byType(CircularProgressIndicator), findsNothing);
expect(find.byType(ListView), findsOneWidget);
});
testWidgets('display error', (WidgetTester tester) async {
// ARRANGE
await tester.pumpWidget(
ProviderScope(
overrides: [
postsProvider.overrideWithProvider(
FutureProvider((_) => Future.error('error')),
),
],
child: const MaterialApp(
home: PostList(),
),
),
);
// ASSERT
expect(find.byType(CircularProgressIndicator), findsOneWidget);
expect(find.text('error'), findsNothing);
// ACT
await tester.pumpAndSettle();
// ASSERT
expect(find.byType(CircularProgressIndicator), findsNothing);
expect(find.text('error'), findsOneWidget);
});
PostCard — (Teste de Widget)
class PostCard extends StatelessWidget {
  final Post post;
  const PostCard(this.post, {Key? key}) : super(key: key);

  @override
  Widget build(BuildContext context) {
    return GestureDetector(
      onTap: () {
        Navigator.push(
          context,
          MaterialPageRoute(builder: (_) => DetailsPage(post)),
        );
      },
      child: Card(
        child: ListTile(
          title: Text(post.title),
          subtitle: Text(post.body),
          trailing: Consumer(builder: (_, ref, __) {
            final favs = ref.read(favoritesProvider.notifier);
            final isFavorited = ref.watch(
              favoritesProvider.select((list) => list.contains(post)),
            );
            return IconButton(
              icon: Icon(
                Icons.favorite,
                color: isFavorited ? Colors.red : Colors.grey,
              ),
              onPressed: () => favs.favorite(post),
            );
          }),
        ),
      ),
    );
  }
}
// Mock classes for Navigation
class MockNavigatorObserver extends Mock implements NavigatorObserver {}
class FakeRoute extends Fake implements Route {}
testWidgets('PostCard - navigate to details page', (tester) async {
// ARRANGE
registerFallbackValue(FakeRoute());
final post = Post(id: 1, userId: 1, title: '', body: '');
final mockObserver = MockNavigatorObserver();
await tester.pumpWidget(
ProviderScope(
child: MaterialApp(
home: PostCard(post),
navigatorObservers: [mockObserver],
),
),
);
final button = find.byType(PostCard);
// ASSERT
expect(button, findsOneWidget);
// ACT
await tester.tap(button);
await tester.pumpAndSettle();
// ASSERT
verify(() => mockObserver.didPush(any(), any()));
expect(find.byType(DetailsPage), findsOneWidget);
});
testWidgets('PostCard - favorite button', (tester) async {
// ARRANGE
final post = Post(id: 1, userId: 1, title: '', body: '');
await tester.pumpWidget(
ProviderScope(
child: MaterialApp(
home: PostCard(post),
),
),
);
final button = find.byType(IconButton);
// ASSERT
expect(tester.widget<Icon>(find.byType(Icon)).color, Colors.grey);
// ACT
await tester.tap(button);
await tester.pumpAndSettle();
// ASSERT
expect(tester.widget<Icon>(find.byType(Icon)).color, Colors.red);
// ACT
await tester.tap(button);
await tester.pumpAndSettle();
// ASSERT
expect(tester.widget<Icon>(find.byType(Icon)).color, Colors.grey);
});Como você pode ver, também precisamos simular o NavigatorObserver e o Route para lidar com as operações de navegação e, para usar o método didPush, também precisamos registrar o Route primeiro. Porque se um método tiver um argumento de tipo personalizado, deve ser registrado usando o método registerFallbackValue, consulte os detalhes.
class NavigatorObserver {
  void didPush(Route route, Route? previousRoute) { }
  ...
}
FavoriteButton — (Teste de integração + Capturas de tela automatizadas)

Estrutura de pastas
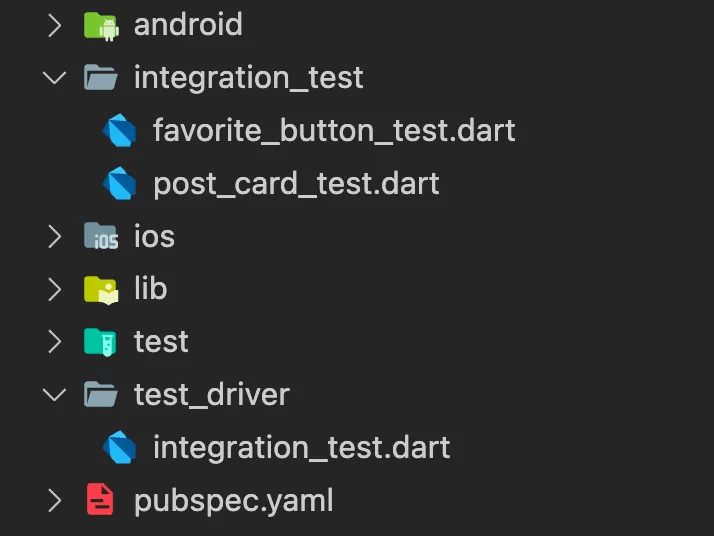
Você pode ver que os testes de integração e o driver de teste não estão na pasta de teste.
O motivo é principalmente sobre o desempenho, mas também existem outros motivos por trás disso, como escopos diferentes, etc.
Você pode obter mais informações sobre isso aqui.
Além disso, a documentação oficial faz a mesma coisa!
É por isso que devemos separá-los também!
Future<void> main() async {
  try {
    // initialize a driver to get screenshots
    await integrationDriver(
      // (Optional): triggers on every screenshot
      onScreenshot: (String name, List<int> bytes) async {
        final path = 'screenshots/$name.png';
        final image = await File(path).create(recursive: true);
        image.writeAsBytesSync(bytes);
        return true;
      },
    );
  } catch (e) {
    if (kDebugMode) print('Error occured: $e');
  }
}
void main() async {
final binding = IntegrationTestWidgetsFlutterBinding.ensureInitialized();
testWidgets('FavoriteButton - works properly', (tester) async {
// (Optional): It helps to take screenshots
await binding.convertFlutterSurfaceToImage();
// runs the app
app.main();
// awaits to settle the widgets
await tester.pumpAndSettle();
// (Optional): takes a screenshot
await binding.takeScreenshot('screenshot');
// if finds a [ListView]
expect(find.byType(ListView), findsOneWidget);
// gets the first favorite
final button = find.byType(IconButton).first;
// and expect its color is grey
expect(tester.widget<Icon>(find.byType(Icon).first).color, Colors.grey);
// then clicks on it
await tester.tap(button);
await tester.pumpAndSettle();
// (Optional): takes a screenshot
await binding.takeScreenshot('screenshot2');
// then expect the color is turned to red
expect(tester.widget<Icon>(find.byType(Icon).first).color, Colors.red);
// clicks again
await tester.tap(button);
await tester.pumpAndSettle();
// (Optional): takes a screenshot
await binding.takeScreenshot('screenshot3');
// and expect again it turns back to grey
expect(tester.widget<Icon>(find.byType(Icon).first).color, Colors.grey);
});
}Cobertura
Obter um relatório de cobertura para os testes é muito fácil!
Basta executar três comandos e pronto!
# Step 1, Run test using --coverage flag
# This step will be created the test results
flutter test --coverage
# Step 2, convert HTML file the generated coverage report
# This step will give us an HTML file to see the report
genhtml coverage/lcov.info -o coverage/
# Step 3, Open the HTML file to see the results
# Actually, you can just basically open the HTML file with a browser instead of using this command
open coverage/index.html
e aqui está o resultado dos testes!


